Ads 468x60px

Showing posts with label Android Tricks and Tips. Show all posts

Wednesday, 27 January 2016

How to Unlock Your Android Phone’s Bootloader, the Official Way

17517955832_c64235ce83_b
Unlocking your Android phone’s bootloader is the first step to rooting and flashing custom ROMs. And, contrary to popular belief, it’s actually fully supported on many phones. Here’s how to unlock your bootloader the official way.

Not Every Phone Will Let You Do This

There are two kinds of phones in this world: Those that let you unlock your bootloader, and those that don’t.
Whether you’re allowed to unlock your bootloader depends on the manufacturer of your phone, the model you have, and even your carrier. Nexus phones are all unlockable by nature, and many phones from Motorola and HTC allow you to unlock your bootloader through a similar process as the Nexus.
Other phones, however–and some carriers–don’t allow you to unlock your bootloader the official way, which means you have to wait for developers to exploit a security vulnerability if you want to root and flash ROMs. If you have one of those phones, this guide will sadly not help you.
The best way to find out which category your phone falls into is to browse its section at XDA Developers. If you have an HTC or Motorola phone, you may be able too research its unlockability on HTC or Motorola’s website. If it doesn’t support unlocking, you’ll have to use an unofficial unlocking or rooting method, which you’ll usually find on the XDA Developers forums.
If your phone does support unlocking through more official channels, read on.

Step Zero: Back Up Anything You Want to Keep

Before we begin, it’s important to mention: this process will erase all of your data. So if you have any photos or other files on your phone that you want to keep, transfer them to your computer now. In addition, if you have any app settings you want to keep, use their backup function to create a backup settings file, and transfer those to your computer as well.
Here’s an extra tip: Since I know I’m eventually going to root my phone, I always unlock my bootloader as soon as I buy a new device. That way, I don’t waste time setting it up only to erase the phone in a few days and do it all over again. If you’re an obsessive Android tweaker who knows you’re going to root soon, consider unlocking before you go through the trouble of setting up your phone.
When you’ve backed up everything you want to keep, continue with the steps below.

Step One: Install the Android SDK and Your Phone’s Drivers

screenshot.1

Now you’ll need two things for this process: the Android Debug Bridge, which is a command line tool for your computer that lets you interface with your phone, and your phone’s USB drivers. Even if you’ve installed these before, you should get the latest versions now.
  1. Head to the Android SDK download page and scroll down to “SDK Tools Only”. Download the ZIP file for your platform and unzip it wherever you want to store the ADB files.
  2. Start the SDK Manager and deselect everything except “Android SDK Platform-tools”. If you are using a Nexus phone, you can also select “Google USB Driver” to download Google’s drivers.
  3. After it’s finished installing, you can close the SDK manager.
  4. Install the USB drivers for your phone. You can find these on your phone manufacturer’s website (e.g. Motorola or HTC). If you have a Nexus, you can install the Google drivers you downloaded in step 2.
  5. Reboot your computer if prompted.
Turn on your phone and plug it into your computer using a USB cable. Open the platform-tools folder in your Android SDK folder and Shift+Right Click on an empty area. Choose “Open a Command Prompt Here”, and run the following command:
adb devices
If it shows a serial number, your device is recognized and you can continue with the process. Otherwise, ensure you’ve performed the above steps correctly.

Step Two: Enable USB Debugging
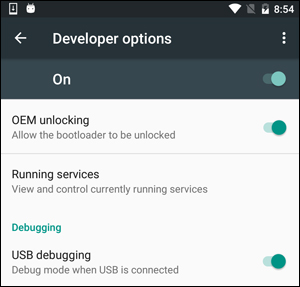
usb_debuggingNext, you’ll need to enable a few options on your phone. Open your phone’s app drawer, tap the Settings icon, and select “About Phone”. Scroll all the way down and tap the “Build Number” item seven times. You should get a message saying you are now a developer.
Head back to the main Settings page, and you should see a new option near the bottom called “Developer Options”. Open that, and enable “OEM Unlocking”, if the option exists (if it doesn’t, no worries–it’s only necessary on some phones).
Next, enable “USB Debugging”. Enter your password or PIN when prompted, if applicable.
Once that’s done, connect your phone to your computer. You should see a popup entitled “Allow USB Debugging?” on your phone. Check the “Always allow from this computer” box and tap OK.

Step Three: Get an Unlock Key (for Non-Nexus Phones)

If you’re using a Nexus device, you can skip the following step. Non-Nexus devices will likely need to go through one extra step before you continue.
Head to your manufacturer’s bootloader unlocking page (for example, this page for Motorola phones or this page for HTC phones), choose your device (if prompted), and log in or create an account.
unlock_page
The rest of this step is a bit different depending on your phone, but the manufacturer’s site should walk you through the process. It will go something like this: First, turn off your phone and boot into fastboot mode. This is a bit different on every phone, but on most modern devices, you can get there by holding the “Power” and “Volume Down” buttons for 10 seconds. Release them, and you should be in fastboot mode. (HTC users will need to select “Fastboot” with the Volume Down key and press power to select it first.) You can usually find more information on your specific phone with a quick Google search, so feel free to do that now before continuing.
2016-01-21 15.03.50
Connect your phone to your PC with a USB cable. Your phone should indicate that the device is connected. On your computer, open the platform-tools folder in your Android SDK folder and Shift+Right Click on an empty area. Choose “Open a Command Prompt Here”, and use that Command Prompt window to retrieve your unlock key as described by your manufacturer. (For example, Motorola phones will run the fastboot oem get_unlock_data command, while HTC phones will run the fastboot oem get_identifier_token command.)
unlock_data
The Command Prompt will spit out a token in the form of a very long string of characters. Select it, copy it, and paste it into the applicable box on your manufacturer’s website–make sure there are no spaces!–and submit the form. If your device is unlockable, you’ll receive an email with a key or file that you’ll use in the next step.
If your device is not unlockable, you’ll get a message stating so. If you want to root your device or flash a ROM, you’ll need to use a more unofficial method, which you can usually find on a site like XDA Developers.

Step Four: Unlock Your Phone

Now you’re ready to actually perform the unlock. If your phone is still in fastboot mode, run the command below. If not, turn off your phone and hold the “Power” and “Volume Down” buttons for 10 seconds. Release them, and you should be in fastboot mode. (HTC users will need to select “Fastboot” with the Volume Down key and press power to select it first.) Connect your phone to your PC with a USB cable.
On your computer, open the platform-tools folder in your Android SDK folder and Shift+Right Click on an empty area. Choose “Open a Command Prompt Here”.
To unlock your device, you’ll need to run one simple command. For most Nexus devices, this command is:
fastboot oem unlock
If you have a newer Nexus, such as the Nexus 5X or 6P, the command will be slightly different:
fastboot flashing unlock
If you have a non-Nexus device, your manufacturer will tell you what command to run. Motorola devices, for example, need to run fastboot oem unlock UNIQUE_KEY, using the unique key from the email you received. HTC devices will run fastboot oem unlocktoken Unlock_code.bin using the Unlock_code.bin file you received from HTC.
After running the command, your phone may ask if you are sure you want to unlock. Use the volume keys to confirm.
fastbootunlock
When you’re finished, use the on-screen menu to reboot your phone (or run the fastboot reboot command from your PC). If everything worked correctly, you should see a new message at boot stating that your bootloader is unlocked, and after a few seconds it should boot into Android. It’s important that you boot into Android before doing anything else, like flashing a custom recovery.
Congratulations on unlocking your phone !!

Tuesday, 1 September 2015

What to Do If You Forget Your Android Phone’s PIN, Pattern, or Password

android lock screen
Android normally secures your device by demanding a PIN, pattern, or full password. Your phone isn’t useless if you forget the unlock code — you can bypass it and get back in.
As Google tightens security, this has become more difficult on modern versions of Android. But there’s always a way to make your phone usable again, as long as you remember your Google account’s username and its password.

Android 4.4 and Below


To find this feature, first enter an incorrect pattern or PIN five times at the lock screen. You’ll see a “Forgot pattern,” “forgot PIN,” or “forgot password” button appear. Tap it. You’ll be prompted to enter the username and password of the Google account associated with your Android device.Older versions of Android — Android 4.4 KitKat and older — have an integrated way to bypass your pattern, PIN, or other password if you forget it. Google removed this feature in Android 5.0 Lollipop, so you’ll have to use a different method if you have a device with a newer version of Android.
android bypass patern

Android 5.0 and Up

This feature was removed in Android 5.0. Unfortunately, this means there’s no built-in way to simply reset your pattern, PIN, or password and gain access to your phone or tablet. This does help provide additional protection to your data, however — attackers have no way of bypassing the passcode unless they actually know it.

You’re left using a few other tricks that might work. For example, on Samsung devices, if you’ve logged into the device with a Samsung account, you can go to the Samsung Find My Mobile website, log in with the same Samsung account, and use the “Unlock my screen” option to remotely remove your device’s lock screen. Other manufacturers might potentially offer similar features if they have a device-tracking website if you’ve signed up for.Android’s Smart Lock feature may be able to save you. For example, let’s say you’ve set up Smart Lock on your Android phone and have it automatically log in when it’s on your home Wi-Fi. You can take your phone to that home Wi-FI network and it will automatically unlock for you, even if you can’t remember the normal unlock code.
If you’ve already unlocked your bootloader and installed a custom recovery, you may be able to use that environment to remove the code. However, it probably won’t be possible to install a custom recovery without factory-resetting your device if you haven’t already done so.

Factory-Reset Your Android Smartphone or Tablet

Assuming you don’t have the easy option to reset the device using one of the tricks above, you should probably give up on the data stored on your device. You can get your device into a usable state again, but that will involve performing a factory reset, wiping the device’s storage, and setting it up again from scratch.
This isn’t as bad as it sounds, as most data on a modern Android device should just sync online. Sign in with the same Google account and you’ll have access to your emails, contacts, apps, and practically everything else. You’ll then be able to set up a new unlock code.
If your device has a removable SD card, you’ll probably want to remove the SD card before performing the factory reset, just to ensure any files stored on there won’t be overwritten. It’s probably best to shut down your Android device, remove the SD card, and then continue..
If your device has Google’s Android Device Manager enabled, you can visit the Android Device Manager website and log in with the same Google account you use on that Android device. Select the device you’re locked out of and select “Erase” to remotely erase it. You’ll be able to set it up from scratch afterwards — the lock code will be removed, but the device will also be wiped.
Note that the “Lock” option in Android Device Manager will only allow you to set a new lock code if your phone or tablet doesn’t already have an unlock code, so it can’t be used to remove an existing lock code.
If you’ve enabled another remote phone or tablet-tracking service, you can probably use its website to remotely wipe your device, too.
If you haven’t enabled Google’s Android Device Manager on your phone or tablet, that’s fine. You can factory-reset your phone or tablet even if you can’t unlock it.

Google offers a list of ways to access recovery mode on Nexus devices. You may have to perform a web search or check your device manufacturer’s support pages to find out how to reset it.The exact way you’ll do this is different on different phones and tablets. You’ll need to boot into your device’s system recovery menu and wipe it from there. To do this, you’ll need to turn the device off and turn it on while holding the correct buttons. For example, on the Nexus 4, you have to press and hold the Volume Down and Power buttons at the same time. On the Nexus 5, you have to press and hold the Volume Down, Volume Up, and Power buttons at the same time. Use the recovery menu to wipe the device.
On devices running Android 5.1, you may have to enter the username and password of the Google account that was previously associated with the device after doing this. This prevents someone else from resetting and using your device. However, you won’t need the old unlock code to regain use of your hardware.

Modern Android devices work a lot more like Apple’s iPhones and iPads. If you forget the code, you’ll need to reset it to its factory default settings to regain access. This begins to make sense when you consider Google’s desire to automatically encrypt all Android devices out-of-the-box. The PIN or password is used as part of the key to decrypt the data stored on an encrypted Android device.
Thank You For Visit Stay Tuned For More..Don't Forget To Like Our Facebook Page...

How to Locate Your Lost or Stolen Android Phone (and Wipe if Necessary)

Thanks to a new native Android tool, you can now easily locate your phone and (in a worst case scenario) perform a remote data wipe. Read on as we show you how to activate the feature on your phone.

Why Do I Want to Do This?


Whether you’re just prone to losing your phone in your house or you’re worried about data security if your phone is actually stolen, there’s no good reason to skip turning on the security features available through Android Device Manager. It’s free, it has next to no overhead, and you can access it to locate your device and/or remote wipe it from any computer you can log into your Google account from.
Even if you think you’ll never need it, it takes so little effort to turn it on that it would be outright foolish to not do so.

What Do I Need?

To follow along with this tutorial you’ll need the following things:
  • 1 Android device running Android OS 2.2+
  • 1 Google account
Note: While Android Device Manager has been available to Google business account users for some time, Google only started rolling it out to consumer/standard accounts in early August, 2013. If Android Device Manager isn’t on your Android phone yet, check back in a few days to see if you’ve received the update.

Turning On Android Device Manager

By default, the new Android Device Manager feature is turned off. In order to enable it, grab your Android phone and navigate to Settings -> Security ->Device Administrators.  This menu will be available to everyone, even if the update hasn’t officially rolled out to their phone. If your phone has received the update, you’ll see the following entry within the Device Administrators menu:
Go ahead and check the checkbox next to Android Device Manager. You’ll be prompted with the following security screen:
Normally those kind of sweeping powers would be a red flag, but in the case of this particular app we’re specifically using it to allow us to remote wipe our phone and change security settings. Go ahead and click the Activate button.
Note: Users on earlier versions of the Android OS may be required to individually check “Remotely locate this device” and “Allow remote factory reset” before accepting the changes.
Once the Android Device Manager has been activated, you can return to the home screen and resume using your phone.

Managing Your Phone via the Device Manager Web Portal

Once you’ve set up the Android Device Manager on your phone, you can begin managing it from the Android Device Manager web portal, available at: https://www.google.com/android/devicemanager. The first time you access the service you’ll need to accept an agreement to allow Android Device Manager to use your location data.

After that, you can select your device from the drop-down menu in the corner and perform one of three tasks.
First, using GPS/Wi-Fi location data from the phone, you can locate the phone. This feature is dependent on recent GPS data, and if the GPS/location functionality has been turned off on the phone for a period of time (say, several days), it will simply report that the location is unavailable.
Second, you can ring the device to locate it if it is in earshot. Even if your phone has the ringer turned off or set to vibrate it will switch to the default ringtone at 100% volume. This is the most practical feature of Android Device Manager as not many people routinely deal with device theft, but many of us are guilty of misplacing our devices.
Finally, you can remotely wipe the device. This function initiates a factory wipe on the device. The portion of the warning “We may not be able to wipe the content of the SD card in your device” is a bit ambiguous. Internal storage designated as /sdcard will be wiped. Removable SD cards may be wiped depending on the hardware/OS version. The business version of Android Device Manager has a specific wipe-SD-card functionality, which if not already deployed in the consumer version of Android Device Manager will likely be deployed in the near future.

Have an Android-centric tutorial you’d love to see us tackle? Sound off in the discussion below and we’ll see what we can do.

Use Smart Locks in Android 5.0 and Never Unlock Your Phone at Home Again

A key in a lock with house icon on i
Don’t you hate it whenever you’re safely at home, and there’s no one else around to access your phone, and yet you still have have to unlock it whenever you want to use it? Android 5.0 Lollipop’s Smart Locks solves that.
Many of you probably know the frustration, you’re listening to something like Pandora or Spotify, and you want to change the station, or give something thumbs down, or bookmark a song — whatever the case, anytime you want to do that, you have to unlock your device. Or, you just want to look something up (OK Google?), or tap out a quick text, or any number of things you do a hundred times a day.
It’s even worse if you’re jogging or otherwise engaged in some vigorous activity. Have you ever tried unlocking your phone when it is in one of those protective exercise cases?
Smart Locks mitigate much of that frustration by letting you set trusted places, where as long as you’re within a certain range, you phone or tablet won’t lock; trusted devices, which will let you assign a Smart Lock to paired Bluetooth or NFC devices; and finally, you can enable trusted face unlocking, which means you can simply turn your device on, look at it and it will unlock, as long as your front-facing camera isn’t obscured.

Turning on Smart Locks

Smart Locks can be set up by accessing the settings. Pull down from the top edge of your device as if you’re going to check your notifications and tap on the gray time/date bar, and then tap the “Settings” gear.
If you don’t already have a lock on your device, you should do that before you set up Smart Locks. We use a pattern to unlock our device, but you can use the PIN or password option too.
Regardless, in the settings, tap the “Security” options an then “Smart Lock.”
2014-11-19 22.53.55.png
In the Smart Lock settings, we have three options; trusted devices, trusted face, and trusted places. You can have one, or the others, or all at the same time. Smart Lock will allow you to have as many trusted devices as you want, but you can only set up one trusted face.

Home is Where You Don’t Have to Unlock Your Phone

You can also have unlimited trusted places, which is really convenient, and what we want to focus on first.
2014-11-19 23.26.32.png
When you tap on “Trusted places,” you can turn on your Home and Work locations assigned in Google Maps or add a custom place.
2014-11-19 23.34.34.png
When you add a custom place, it will open to your current location, which you can immediately add, or you can search for a location or address and add that. It’s important to understand that this relies heavily on the Google Location service, so if you’ve got your GPS enabled, then custom places will obviously be more precise.

2014-11-19 23.05.41.pngIn the following screenshot, we can apparently choose the entire San Antonio metro area as a trusted place by simply tapping the blue bar below the map. Obviously, the idea is to add smaller areas that don’t compromise your device’s overall security, such as a specific business or address.
Here, we’ve elected to add our default home location, which we’ve labeled as such.
2014-11-19_22_44_39_png
As you can see, you can quickly add a variety of custom trusted places that you frequent regularly. As soon as you are in range of a trusted place, the Smart Lock will engage automatically.
Remember, you can also add your Home and Work Google Maps locations? To do that, you must first configure them in Maps by swiping right from the left screen edge and tapping “Settings.”
2014-11-19 23.37.24.png
On the settings pane, tap “Edit home or work.”
2014-11-19 23.38.07.png
Now you can enter your home and work addresses.
2014-11-19 23.37.42.png
You should now be able to turn your work and home address on and off in Smart Locks by tapping the little green button next to each.

Setting up and Using Device Smart Locks

If you want to add a trusted device, such as via Bluetooth, you first need to pair them in the Android Bluetooth settings.
If you already have other devices paired, you can tap “add trusted device.”
2014-11-19 23.26.40.png
On the next screen, tap “Bluetooth” to add a previously paired device.
2014-11-19 22.25.54.png
In this screenshot, we already have several other devices paired, so we can add any of them, and anytime we connect to them, our Smart Lock will activate.
2014-11-19 23.11.55.png
Note, as you pair to Bluetooth devices, a notification will inform you that you can add it as a Smart Lock trusted device.
2014-11-19 20.37.30
If you want to set up a Smart Lock using NFC, you simply tap another NFC-enabled device or tag.
2014-11-19 23.32.17.png
Finally, Smart Lock gives Lollipop users one last nifty feature, which is actually a more refined version of Android’s face unlock feature from previous versions.

Look at Me When You Want Me to Unlock!

Adding a trusted face works much like the old face unlock feature used to work only this is more seamless and isn’t meant to act as a primary method of unlocking your device.
To add your face as a trusted face, tap the “Trusted face” button in the Smart Lock settings. On the initial screen, you’re reminded that face unlocks aren’t as safe as other unlock methods, and someone who looks like you could unlock your device.
Tap “Set up” when you’re ready.
2014-11-19 23.14.47.png
You want to set this up where the light is just right — neither too bright or too dim — and you need to hold the device at eye level.
When you’re ready, click “Next.”
2014-11-19 21.36.58.png
During the next phase, a orange-dotted outline will appear. You look at your device keeping your face inside the dots, which will turn green as Android scans and stores your face.
When it finishes, click “Next” and you’re done.
2014-11-19 23.17.58.png
If your device isn’t in a trusted place or connected to a trusted device, you will see the following icon at the bottom of your lock screen. This means the tablet or phone can be unlocked by simply looking at it.
2014-11-19 20.14.43.png
If successful, the icon will change to an unlocked icon, which you just swipe to open the device.
2014-11-19 20.15.01
Note, if you want to lock the device, tap this unlock icon and it will change to a locked icon. You will not be able to unlock the device with your face, a trusted place, or a trusted device. Instead, you will have to use your conventional unlock method.
2014-11-19 20.15.15
If you find face unlocking doesn’t work well for you in various lighting conditions, you can go back to the Smart Lock settings, tap “trusted face” and you can improve face matching or start over.
2014-11-19 23.22.58.png
Clearly, Smart Locks are one of the coolest security features that Android has gotten, and it’s long overdue.
It’s pretty nifty to be able to now use your phone or tablet in select locations or with preferred devices, and it won’t lock repeatedly throughout the day. Plus, the trusted face feature actually works quite well. In our tests, our 2013 Nexus 7 had no problems with it, unlocking almost instantly the minute we turned the device on and looked at it.
If there’s any one drawback, it’s that trusted places only work with Google Maps-based locations. Being able to use your home WiFi access point would be a welcome addition, but for now you will still need to rely on third-party software. We hope Google incorporates this feature in a future release.
Have you gotten your hands on Lollipop yet? If so, have you set up Smart Locks? Let us know what you think so far by sounding off in our discussion forum. We want to hear your comments and answer your questions.
Update: We originally failed to mention that if you want to use trusted places Smart Locks in Lollipop, you will need Google Play services version 6.5. Google is slowly pushing this update out but if you’re impatient, you can download and sideload the Google Play services APK file.

Monday, 24 August 2015

MX Player Pro 1.7.40/1.7.41 Latest For Free...[ AD FREE ]

MX Player Pro

THIS IS THE AD-FREE VERSION OF MX PLAYER. MX Player – The best way to enjoy your movies.


a) HARDWARE ACCELERATION – Hardware acceleration can be applied to more videos with the help of new H/W decoder.


b) MULTI-CORE DECODING – MX Player is the first Android video player which supports multi-core decoding. Test result proved that dual-core device’s performance is up to 70% better than single-core devices.


c) PINCH TO ZOOM, ZOOM AND PAN – Easily zoom in and out by pinching and swiping across the screen. Zoom and Pan is also available by option.


d) SUBTITLE GESTURES – Scroll forward/backward to move to next/previous text, Up/down to move text up and down, Zoom in/out to change text size.


e) KIDS LOCK – Keep your kids entertained without having to worry that they can make calls or touch other apps. (plugin required)


Subtitle formats:

  • DVD, DVB, SSA/ASS Subtitle tracks.
  • SubStation Alpha(.ssa/.ass) with full styling.
  • SAMI(.smi) with ruby tag support.
  • SubRip(.srt)
  • MicroDVD(.sub)
  • VobSub(.sub/.idx)
  • And More
What’s New:-

Support online subtitle downloading.


Action for keyboard(DPad) up/down key can be defined on Playback screen > Menu > Display > Touch


Can delete/rename files on external storage on Android 5.0 Lollipop and later.


Added an option for disabling playback interface auto hiding.


Added an option for requesting root privilege on Settings > General > Request root privilege. It works only on rooted device and may allow delete/name files on external storage on Android 4.4 KitKat.


Added an option for perform ff/rew on next/prev media buttons on Settings > Player > Next/Prev -> FF/Rew.


Added SW audio (local) option under Settings > Decoder.


Display album arts on the lock screen while playing in background on Android 5.0 Lollipop. 


This behavior can be disabled on Settings > Player > Background play > Album art.

Playback screen theme can be changed on Settings > Player > Theme, for Android 3.0 Honeycomb and later.


Added sleep timer on Menu > Tools > Sleep timer.


Bug fixes


Note:
Patched version, no lucky patcher or Google Play MOD needed!


Please remove all previous version and codec at first!!!
Make a backup of your current version’s data/setting (if necessary)
Restore your backup data/setting (if necessary)


Download Links:-

MX Player Pro v1.7.41 Cracked APK (13 MB)


For some users, above version may not work. Try the previous version given below.


MX Player Pro v1.7.40 Cracked APK (12 MB) 


Thank your for visit..if you have any issue then feel free to comment below...


Saturday, 22 August 2015

How To Increase Ram Of Android Device

Many guys Have Hang problem on Android Device Coz of low Ram in Device so in this post you will know Best Method to Increase Android Device Ram Using Sd-Card. If you have Hang problem you must use this method to increase Your ram.


Features :-

• You can increase ram Upto 4 GB ( depends on your device and memory card )
• Widget for Easy one click swap
• Detailed info of your memory and details about it
• Very easy to use and really Clean interface
• It works with Allmost every Android device.


Requirements :-


  • A rooted android phone, Coz Without Root It not works.(so if you not have rooted Android Find a way for HOW TO ROOT You’R Device)
  • An Internal / External SD card on your phone.
  • A app “ROEHSOFT RAM EXPANDER” you can get this app from play store but you need to pay For this app.(Else download It from Below given link for free)


ROEHSOFT RAM EXPANDER For free LINK

Steps For Increase Ram Of Android :


  • Just Simply Download And install the Above Described App
  • Then open it and give him root Permission when ask for that
  • Now Go to option menu and set Swap Directory via “SELECT SWAPDIR” (Optional)
  • Now to increase RAM click on the SWAP Button then it will take some to create a swap file..

How To Increase Ram Of Android Device


  • when the process is finished just click on the grey colored box and activate the swap file created.


How To Increase Ram Of Android Device


  • Congratulations you have successfully increased the RAM of your Android smartphone.
  • This ram will not show in the Setting>Task manager but you can feel the change with the overall Device performance which seems to be boost up.

Proof:-
How To Increase Ram Of Android Device


Friday, 21 August 2015

How to Use Gravity Box For Customize Android Phone Like New

Customize Android Phone : After some month back i was having an mobile which was of karbonn like we know that they don’t prepare their own roms so when i saw that mobile i was shocked to see that it was of 4.2.1 Jelly Bean and whenever i checked for updates there are no updates available for this devices. There are several apps to customize android is available, But Xposed & Gravity Box is one of the Top app from them.


Best customization apps for android

So I thought there was ano Roms for this device and what should i do now and i was not having knowledge of porting the roms which is a little tough process which can be done with MediaTek devices and now i was little worried about that so den i found an app called as Framearoot which rooted my Karbonn mobile which was Running in Vanilla Os and it was easy for me to root

Personalisation apps for android

After using Apps like that i tried Using Rooting applications For e.g, Rom Tool box bro, Rom manager i thought tat by using this apps there will be one day when XDA will launch a rom for this mobile so after that i didn’t found any Then i contacted one of my friend who is very much expert at all this kind of stuffs so i messaged him and i asked that is there any way to get rid of Jelly Bean so he was like
I will help you to customize your whole android device in lollipop or kitkat but when u will click on Android art u will be shown Jelly bean logo with 4.3 Version so then i Thought that my mobile is Android Jelly Bean 4.1.2 How is that possible after that we have a get to gather.
First of All he downloaded Build prop Editor and he edited the version of my Android Device and mobile suddenly took a reboot i was afraid and when i saw that i was surprise the version changed and now its time to get jelly bean status bar and all so here are the steps about what kind of setting you will find while using gravity box

NOTE:- THIS SOFTWARE HAS HUNDRED OF SETTING PLEASE CHANGE THE SETTINGS ONLY IF YOU WILL KNOW ABOUT THE SETTING WHAT IT IS ABOUT

How To Change Your Device From Jelly Bean To Kitkat or LolliPop:-

  • First of all backup your Rom Install Xposed Installer From HERE – xposed framework
  • Open the Xposed module and go to install/reboot Then Reboot your device and wait for sometime
  • Now open the application and go to download Wait for the modules to get load (Having A fast Internet connection for getting load the Modules)
  • There are numbers of modules available in Xposed framework don’t use that framework until you know about it if u wanna try any framework you can reply me in comment i will surely help you out.
  • Now Search for gravity box When u will see gravity box move the slider to the right and you will find That you can gravity box apk download. JellyBean | Kitkat | lollipop
  • After getting install it will say u how to reboot your device it will reboot your device And now open the application which is installed in your Menu screen
  • Now you will see numbers of settings in the application for example like Notification bar setting status bar setting start editing the every setting which you love to do it
  • If you find any setting which you don’t understand i will surely help you out
After somedays i Tried to make my mobile Look Like kitkat so I used launcher which is one of my favorite launcher it is Nova Launcher and i choose theme for kitkat but whenever i use to see the status bar i was really getting irritate while seeing all the things in blue like battery bars and all. So i Was used Gravity Box For it. Follow Full Guide Carefully & make your android Phone Look Like Brand new phone & Shock your Friends too. 


Stay Tuned for more updates ..

Tuesday, 11 August 2015

[Lucky Patcher] Remove System apps Easily (Full Guide)

 
^ Scroll to Top